Horns and quality issues in vinyl record pressing
Martin Frings
21 November 2023
What are horns?
Horns are a cutting defect that results in a small ridge along the top of the groove wall.
These ridges or shoulders formed on the top edges of the groove can vary in size from insignificant to serious in terms of their effect on audio quality. The illustration below shows – in exaggerated and diagrammatic form – what horns are.
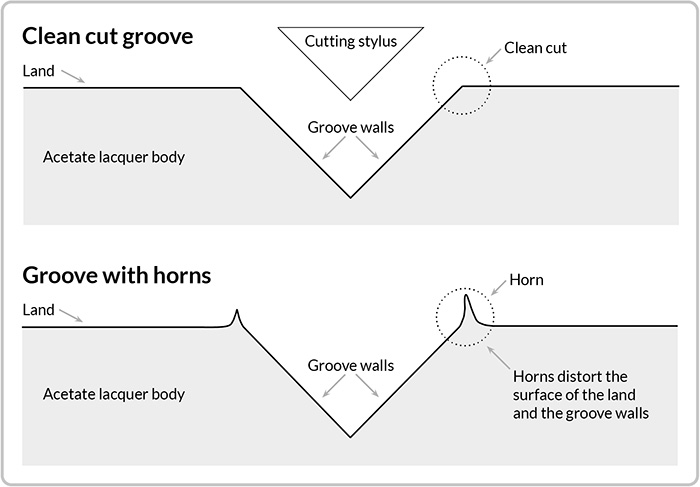
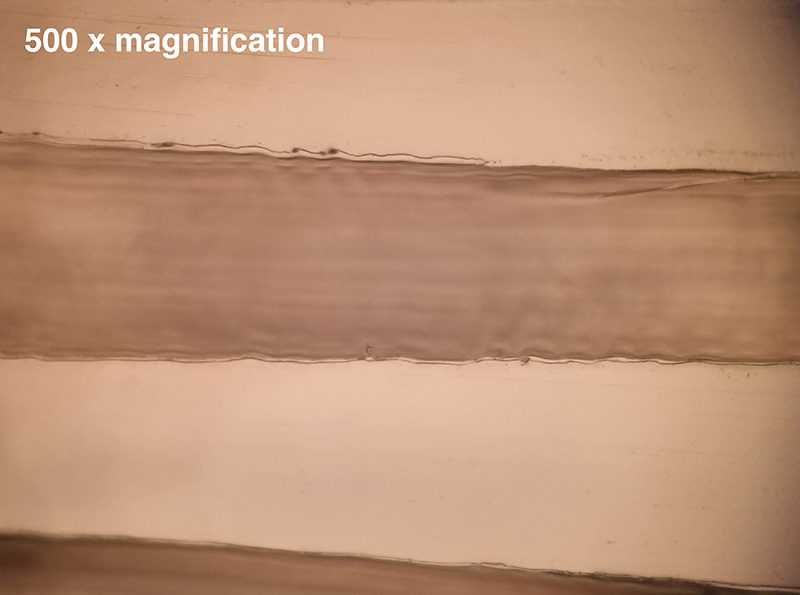
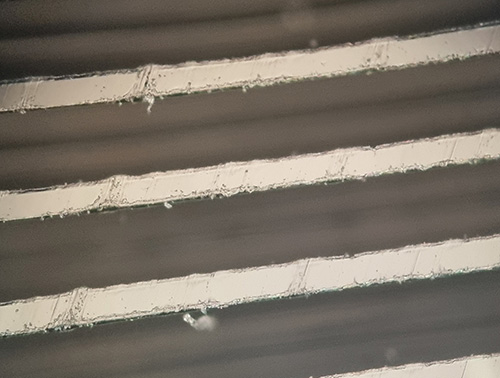
Images of grooves with horns
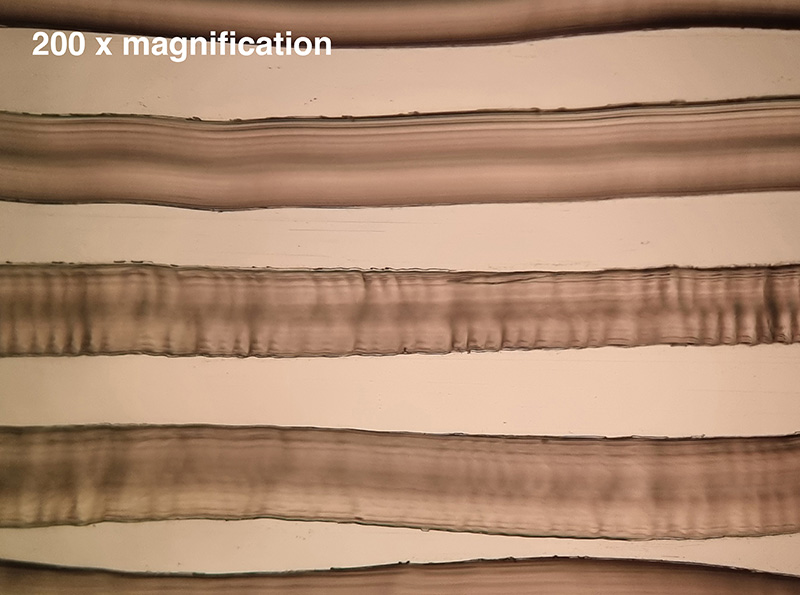
Images of grooves without horns
What causes horns?
The level of the cut
The size of a horn is proportional to the pressure exerted against the acetate by the cutting stylus. The horn is formed immediately behind the cutting stylus as it cuts through. The plough-pressure effect creates a higher internal pressure area immediately behind the cutting stylus.
The deeper the groove, the wider the groove, the higher the pressure, the bigger the horn.
Thus the level of the cut is often the root cause of horns. When the level increases, the stylus cuts a wider and deeper groove. This causes an increase in pressure on the cutting face of the stylus – since the stylus gets larger towards the top and is cutting out more acetate.
Problems with the cutting stylus
Other factors that can contribute to the development of horns include:
- an overheated stylus – if the stylus is too hot, it melts the acetate surface forming minute cracks.
- an underheated stylus – this increases the pressure against the acetate, forcing the material up into shoulders or horns. It can also cause groove edge chipping.
- a poorly calibrated cut – kissing or close grooves can result in very high horns where the two ridges plough into each other.
- a worn stylus – this also increases the pressure against the acetate.
There are a very limited number of producers of cutting styli and lacquers in the world, and product quality of both cutting styli and lacquers can be variable.
Variations in the lacquer coating
Not all lacquer blanks are identical. Occasionally, lacquers are released onto the market which differ from the ‘standard’ coating.
Often referred to by cutting studios as ‘green’ lacquers‘, these can have an excess of volatiles because they have not been dried or cured properly, meaning the acetate is softer and ‘claggier’ in nature, and forms horns more easily as the stylus pushes and cuts through it. This can cause an increase in cutting swarf accumulating on the stylus and being left behind in grooves as well. If the latter occurs this can result in a partially melted bit of swarf coming off the stylus and sticking to the groove wall which in turn will present itself as a pop on the finished record.
Anecdotally, some engineers believe there has been an increase in horns over a 5 year period on lacquers that are produced during summer months. The specific reasoning for this is unclear but a guess would be that either warm or humid weather affects the curing or manufacturing process.
By tracking lacquer batch numbers, Stamper Discs has noticed an increase in horns from even the most reputable cutting studios when lacquers have been improperly cured at the manufacturing stage – or there is a variation in the nitrocellose coating mix.
Whilst every cutting studio will take steps to avoid them, they will inevitably arise occasionally. The challenge is that we need to find ways of minimising the effects of horns.
Diagnosing when horns are present
The photos on above showing a lacquer with horns is a severe example – and can be easy to spot and identify. Horns such as these would be grounds for a rejection at the plating stage.
But horns are rarely as extreme as this, or may only affect the very inner diameter of the cut. To some degree, minor horns are simply part of the production process.
Having horns present on a stamper when pressing, results in small ridges along the top of the groove wall of the pressed record. This can manifest as the audio defects that you hear from non-fill and stitching. But these defects can also be caused by incorrect ‘flow’ of PVC – hence the difficulty of diagnosing whether horns are the root cause of the problem.
While non-fill and stitching can often be alleviated by altering press and extruder settings to ensure a better flow of PVC, the truth is that if the non-fill/stitching is caused by a severe case of horns, there is nothing you can do to fix it.
As with most issues relating to controlling the PVC flow as it spreads out from the centre of the discs, one side of the groove is ‘in the shadow’ of the PVC and more susceptible to issues of non-fill at the pressing stage. Thus the issue disproportionally appears only to affect the right channel when it is in fact present on both.
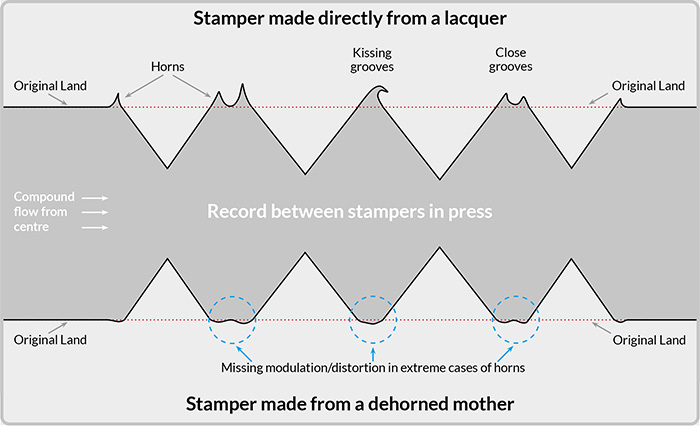
The diagram below shows a cutaway view of a pressed record between stampers.
The top stamper has been made directly from a mother, without de-horning. This shows the horns as minute crevasses at the bottom of the stamper grooves, as discussed above. The bottom stamper has been made from a de-horned mother. (See a later section for a discussion of de-horning.)
The plating effects from horns
One of the main issues that horns present at the plating stage is that they trap tiny bubbles of the pre-treatment solution and act as nuclei for growth. This creates nodules on the back of the stamper which then translate to dimples on the finished record – one of the main issues associated with horns.
One potential way to side-step this is to plate a lot slower – so that electroforming a stamper takes 4 to 8 hours as opposed to 1.5 hours. This ‘slow plating’ approach has a self-levelling effect on the nickel deposit and it means that it simply doesn’t matter whether or not horns are present.
For some very large plants in the past this was an approach they adopted. But in today’s world this is both impractical and economically unviable in terms of productivity.
Damage when a stamper is separated from a mother
When extreme cases of horns are present on a lacquer, they are replicated as minute crevasses in the nickel stamper (see diagram above).
It is difficult to plate these tiny crevasses faithfully when making a mother from a stamper. Then when the mother is separated from the stamper, if a long, deep horn was successfully replicated, it may break off, either staying in the bottom of the stamper or falling out.
The separation can result in weak areas formed in the top of the groove walls, which later result in damaged grooves and noise on the stamper made from the mother.
A 1975 Technical Report from the Keysor-Century Corporation goes so far as to claim that this particular problem may not be apparent on a test pressing or the early part of a run. They postulate that the weak areas in the top of the groove walls may not fail until part way through the run.
Stamper Discs isn’t a pressing plant – so we have no first-hand experience of this phenomenon. But if it is true, it is another reason why horns can be difficult to diagnose.
The importance of a good microscope
For these reasons, it can be difficult just from listening to a pressed record, to diagnose whether horns are the cause of audio defects… or whether it is something else.
The best weapon we have in the fight against horns is simply a good microscope. The images shown earlier in this white paper will give a clear example of what horns look like.
If horns are so bad that they are clearly visible, then that is grounds for rejection and resupply of a re-cut lacquer. The fact that they are comparatively easy to identify should give you some confidence in demystifying them.
What are the possible solutions?
Prevention
The most effective solution to horns is simply to ensure they don’t exist in the first place. Choose a studio that does not try to cut overly loud and understands the issue.
It is important to recognise that a skilled cutting engineer with a well-maintained lathe, will very rarely cut a lacquer with horns of sufficient size that they impact on sound quality.
Historic papers on vinyl production such as internal white papers by Capitol Records will go as far as to say that this is the only solution to horns. That may be the case when you are as large as Capitol Records and can control everything from the lacquer manufacture, to the PVC supply, to the cutting engineer, to the pressing plant. But for the new wave of plating and pressing plants, unfortunately we do not control the whole supply chain and manufacturing process…
It is still necessary to reject the lacquer in the most extreme cases of horns. But milder cases can be treated in the following ways.
De-horning
This involves ‘polishing’ the face of the mother. It is the most common approach to horns, adopted by many of the larger plants.
Whilst the illustration at the beginning of this post shows a nice smooth arc of a horn from the top of the groove wall, in reality this will be a jagged edge that has broken in certain places under its own fragility. The process of de-horning means that all you are doing is smoothing and dulling the horns so that they are less intrusive and jagged.
As shown in the second illustration, de-horning can make some changes to the modulation of the audio – if the cut is such that the audio modulations extend above the ‘land’ surface of the lacquer.
But in most instances where minor horns are present, de-horning does not have any perceptible impact on audio quality. (See the section on De-horning and audio fidelity later on.)
This leads onto four main issues with de-horning:
- It is very labour intensive. Most plants do it to 100% of metalwork even though horns may only present an issue on a small number of jobs.
- It is very variable in terms of pressure from operator to operator. Pushing too hard could leave striations on the groove walls which lead to an increase in surface noise. Sibert have developed a proprietary dehorning machine that large plants use to sidestep this issue.
- If de-horning is done too heavily it leaves unsightly marks on the record.
- Lastly and most importantly, de-horning is of no use to customers that want 1 or 2 step processing options. The dehorning is done to the mothers and only the subsequent stampers benefit.
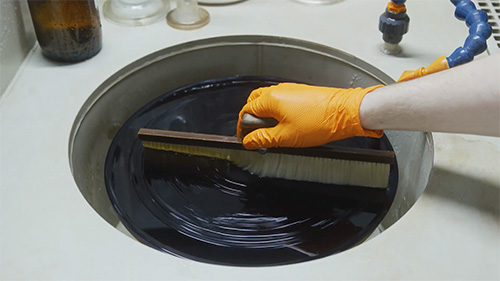
Lacquer brushing
The Stamper Discs’ approach is based on the insight that in most instances where you have minor horns, it is not so much the horns themselves that are the problem, but their ability to ‘capture’ minute pockets of solution and thus create nuclei for growth. Once this happens the problem is replicated and amplified at each subsequent stage of plating.
Therefore the biggest step we take when dealing with horns is to try to eliminate them before plating begins.
De-horning can be effective at rounding the jagged groove edges of the horns – but we believe it is more effective to do this at the lacquer stage so that the horns avoid being replicated through the process.
It requires a lot of abrasion to attack a nickel disc but due to the softer nature of a lacquer it is possible to do this with such little force that there is no risk of an effect on the audio.
Gentle plating
 Whilst we do not run our baths in a way that would be described as ‘slow-plating’, (see earlier section ‘The plating effects from horns’) we have very careful programming control of our ramp time, as well as a healthy amount of headroom with current density.
These measures give us something of a levelling effect. They also avoid the potential risk of reinforcing and amplifying horns – which would be the result of foreshortened ramping, and plating at an aggressive current density.
De-horning and audio fidelity
It is a common belief that the dehorning process can ‘dull’ the sound of the record.
The thinking behind this belief is that the modulations along the groove wall that represent the ‘high end’ of a record (frequencies above 5 kHz up to 12 kHz) are so slight and delicate that the process of dehorning would minutely ‘smooth’ the groove walls and thus affect the high frequencies in the audio.
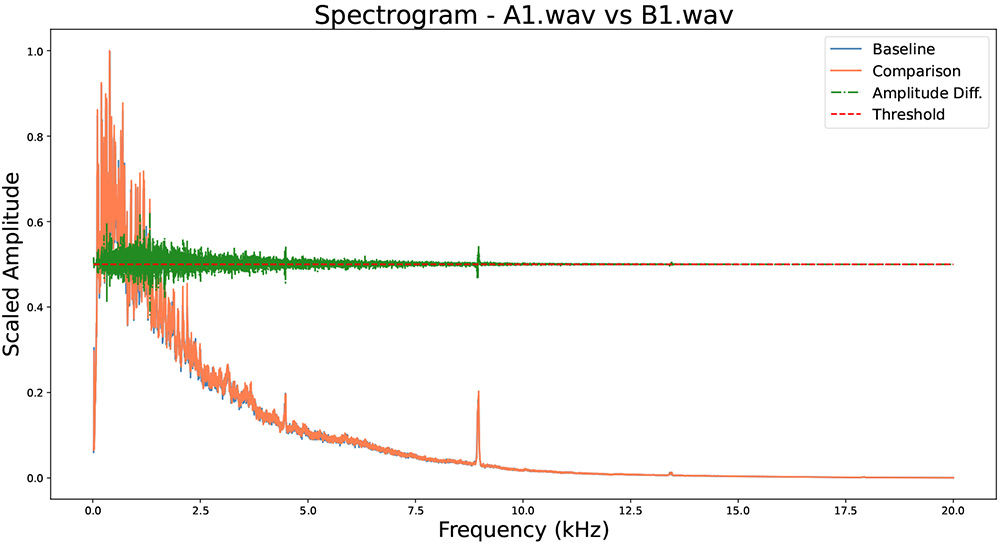
To try to test this, we produced two records identical in audio and cut in quick succession on the same batch of lacquers.
On Record A we heavily brushed the lacquer and dehorned the mother.
On Record B we did not brush or carry out any dehorning.
Then we analysed the recordings on our in-house software, Fonograph.
This chart shows the amplitude across the frequency range 0 to 20kHz of Record A (in blue), with Record B plotted on top (in orange). They match very closely.
This next chart shows the amplitude plots just across the high frequency range
5 kHz to 20 kHz. There is no discernible difference in the audio between Record A (dehorned) and Record B (no de-horning).
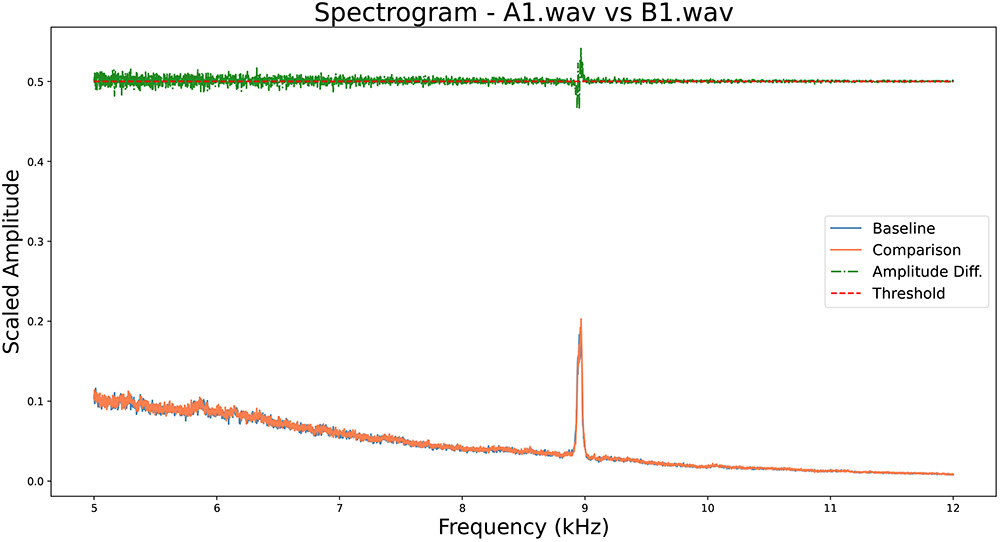
We found no distinguishable difference between Record A and Record B. Even when we focus on the highest end of the frequency range (see the second chart on the previous page) there is no loss in the high end frequencies as a result of de-horning.
Stamper Discs has done a series of tests relating to other aspects of the stamper manufacturing process and analysed the the results using Fonograph. In almost all instances where there have been changes in audio fidelity it has been clearly visible on the Fonograph results. Previous Fonograph plots have also picked up very subtle changes that were not immediately apparent to experienced listeners using headphones.
However, it is important to caveat these test results by saying that neither of our two test records had extreme horns. However with a very loud cut, where the audio modulation extends up into the horns, de-horning will clearly result in some missing modulation.
And it is also true that over-zealous de-horning can also leave marks on the groove wall that increase surface noise.
But our test demonstrates that if de-horning is done with restraint, on typical cuts with minor horns, then it has no effect on audio quality.
It may also help salvage a record that has a bad case of horns, and make the finished record acceptable.
Horns and sleeving marks
A recent misconception about horns is that they cause scratch and scuff marks when sleeving records.
The main flaw in this theory is that it assumes that all records have horns.
The frequency of scuff marks at some pressing plants does not correlate with what would be considered a ‘normal’ amount of horns. (As a galvanics house that receives many thousands of cuts each year, the percentage with noticeable horns is quite low.)
The majority of pressing plants also receive lacquers from a wide variety of cutting studios, cut onto a range of different lacquer batches. You can see how this would place the common denominator as the pressing plant.
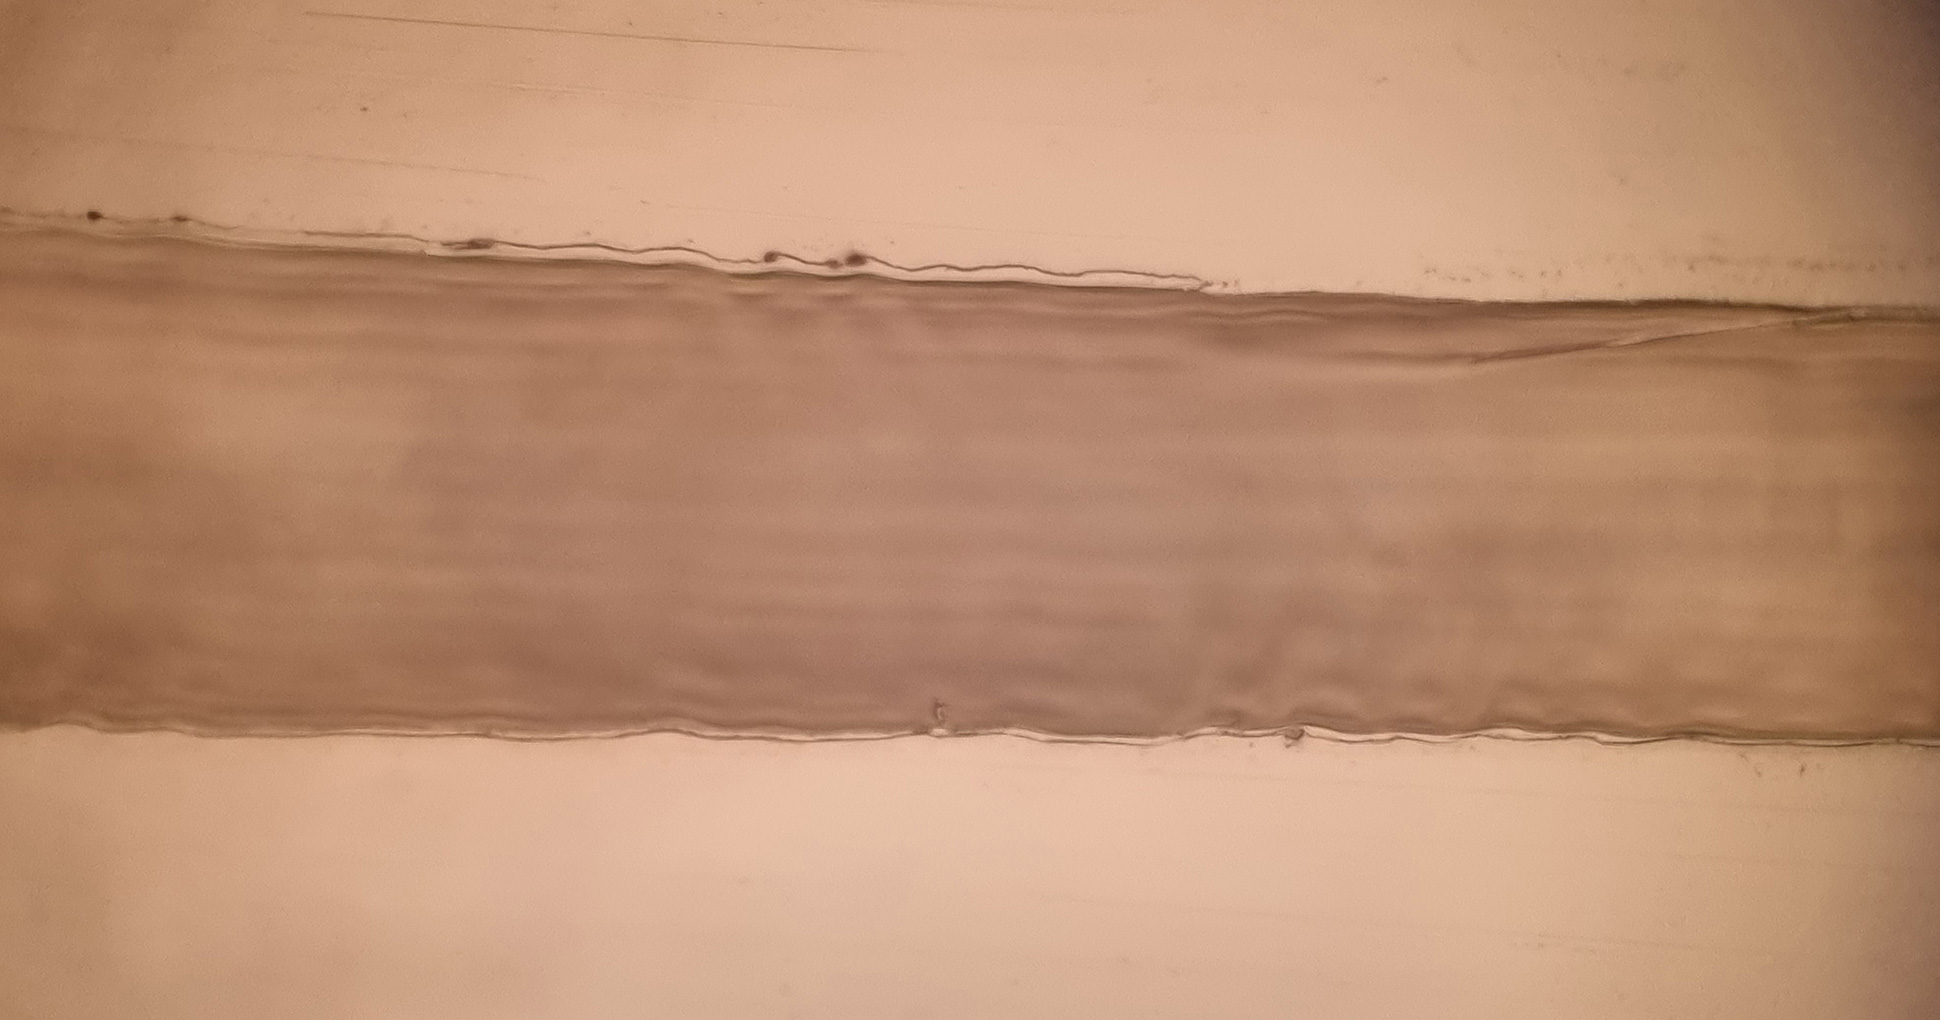
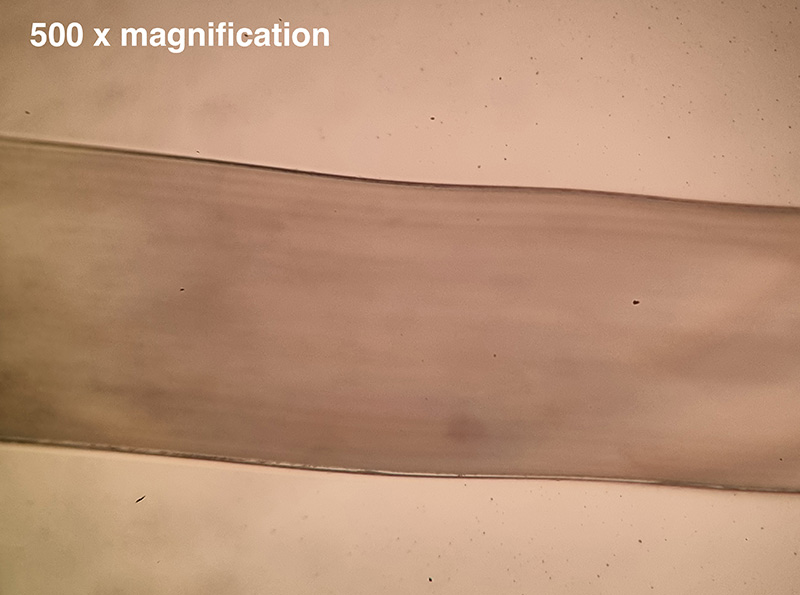
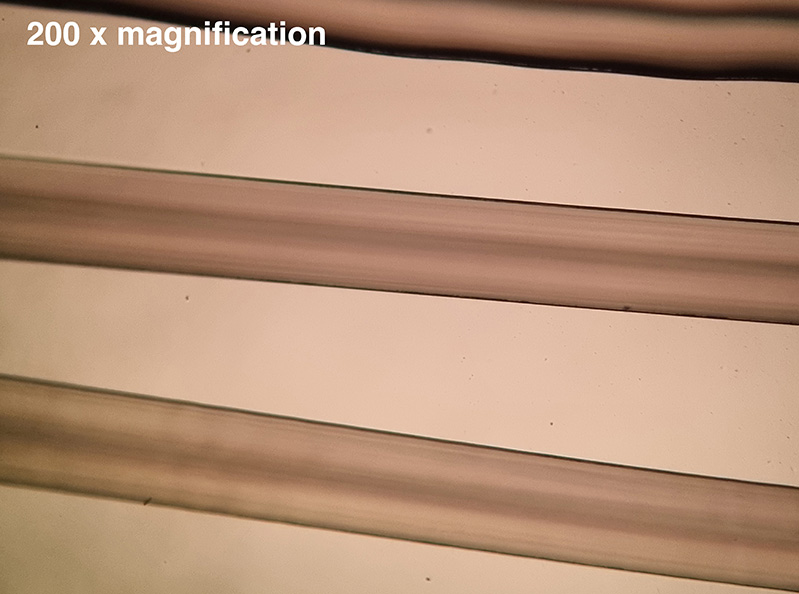
Below we show microscope images of two different finished records. Both records have been housed in a plain paper sleeve that has no poly-lining. They have then been sleeved and unsleeved exactly 100x.
Record A has been rigorously dehorned, and Record B has been completely untouched throughout the plating process. There is no difference between the two.
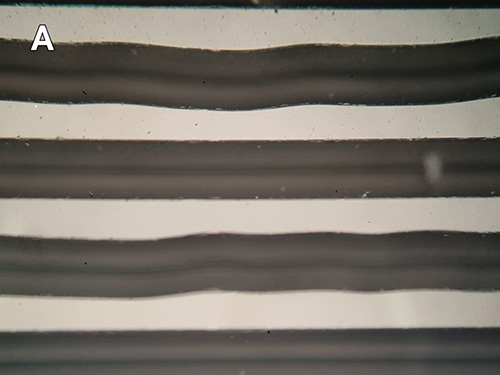
Here is Record A (de-horned) after being sleeved and unsleeved 100x
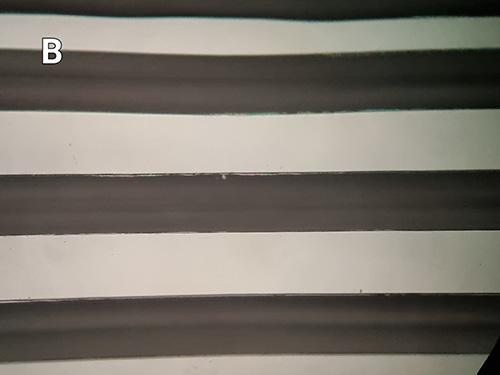
Here is Record B (no de-horning) after being sleeved and unsleeved 100x
For comparison, a scuffed record
Again we must caveat these results with the reminder that the two test records did not have extreme horns. And Stamper Discs is not a pressing plant so we do not want to hypothesise too heavily on the cause of scuff marks,
But it is clear that the level of horns present on a typical cut does not cause scuffing.
Not all paper sleeves are the same..
Widely available paper sleeves are not well specified for vinyl record sleeving. Whilst poly-lined paper sleeves or Japanese D Sleeves are a nice premium option, there is no reason that a paper sleeve shouldn’t be adequate.
Paper sleeves on second hand records from 1980–1990 are often much more calendered than modern paper stocks commonly used for record sleeves. Variations such as lightly waxed paper also seem to have disappeared from the market.
Pressing plants should specify a highly calendered uncoated paper for inner sleeves so that the paper surface is smooth and uniform.
Variations in cooling time
The amount of cooling time after pressing, before the record is sleeved, varies considerably from plant to plant. This perhaps explains why some plants rarely ever have the issue of scuff marks, and why some plants find it to be the default when using paper sleeves.
It is widely accepted in the industry that 24 hours of cooling time is appropriate to stabilise records after pressing to avoid warping. We know of instances of plants shortening their cooling time to as little as 8 hours. It is unclear whether this is adequate to avoid any warping of the record but it may be the case that leaving the record for a full 24 hours has the added benefit of hardening the PVC so it is not so easily affected by the sleeving process.